Add
a New Theme
Besides choosing an
existing theme,
you can also create
and apply a new theme
to your store pages.
|
 |
Open the StoreFront
Web Manger and click the StoreFront
Design tab. Locate the
Design Elements, Themes area.
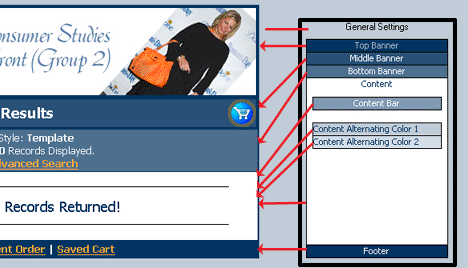
A theme controls the look of
all store pages, not your homepage.
Click the New button.

|
 |
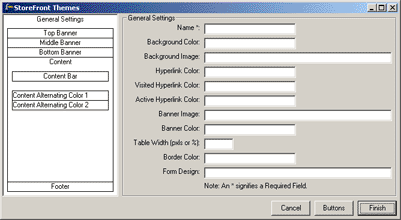
Fill in
the settings.
- Click General
Settings in
the page selection area
on the left side of the
window. The current color
scheme is displayed on
the left, inside the
StoreFront Themes window.
The right side of the
window is the settings
area for the page area
chosen from the left
side.
While in the StoreFront Web Manager,
click Help, and
then Help Topics to
search on "Themes" if you would
like a very detailed explanation
of the areas shown below.
- Choose more page areas
on the left side of the
window by clicking on titles.
- Fill in the values in
the element fields on the
right side of the window.
- Right-click inside any
field to browse files.You
can also display the Color
Palette this way to select
a color for the element.
- Repeat these steps for
the remaining page areas:
- General
Settings
- Top
Banner
- Middle
Banner
- Bottom
Banner
- Content
- Content
Bar
- Content
Alternating Color 1
- Content
Alternating Color 2
- Footer
|
 |
Select
buttons.
- Click Buttons in
the StoreFront Themes window.
- Click Use Default to
fill in all button fields.
If you wish to use a customized
button, right-click a field
and select your button
image from your group images
folder.
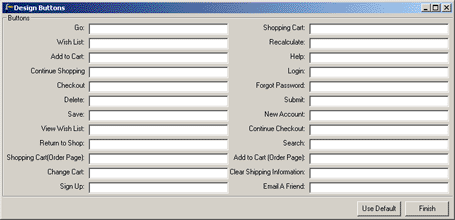
- Click Finish.
- Click Finish again
in the StoreFront Themes
window.
|
 |
Select
the new theme and save your
changes.
- Click the checkbox next
to the new theme.
- Go to the File menu in
the StoreFront Web Manager
window and click Save
Setup.
- Close all windows until
the Configure Store Window
is finally closed.
|
 |
Upload your
entire site and visit your
group homepage to see the changes. |