Manage
Your Store

Add
or Edit Products
Add
or Edit Attributes for a Product
Add
or Edit Categories, Manufacturers,
or Vendors for All Products
|
|
Add or Edit Products
|
 |
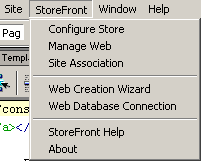
Open Dreamweaver. On the StoreFront
menu item select Configure Store.
|
 |
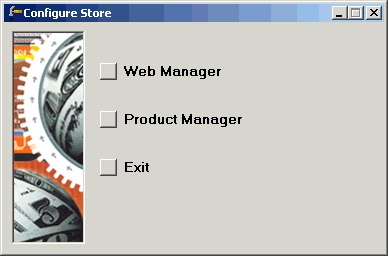
Click the Product Manager button.
|
 |
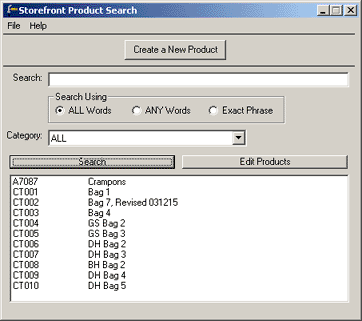
Click Create a New Product,
or click Search and double-click the
product you wish to edit in the StoreFront Product Search window.
|
 |
Click the General tab and enter or edit the
product information.

- Activate Product: When checked, this enables
customers to search inventory for an item and order it from
the Search Results and Product pages. If unchecked, the item
will no longer be available from a search and cannot be ordered
from a Product page.
- Product ID: This is a unique identifier
for each product. Enter any combination of numbers and letters,
but avoid using spaces or special characters. You cannot have
two products with the same Product ID. If you are editing a
product, you cannot edit the Product ID.
- Name: Enter a brief descriptive title or
label.
- Plural Name: Enter the plural name of the
product, usually by adding an "s" at the end (e.g.,
Twill Handbag becomes Twill Handbags). This is for consumers
who select multiple units of the product.
- Short Description: Enter phrases to describe
the product. This can be up to 255 characters and is shown
when the item is displayed as the results of a product search.
If no product Short Description is entered, the product Long
Description will be displayed instead.
- Long Description: Provide a more detailed
product description. This can be up to 32,000 characters.
- Price: Enter the single unit price without
a dollar sign.
- Sale Price: Enter a reduced price without
a dollar sign if the product will have a sale price. The checkbox
will activate or deactivate the sale price.
|
 |
Enter or edit information on the Detail tab.
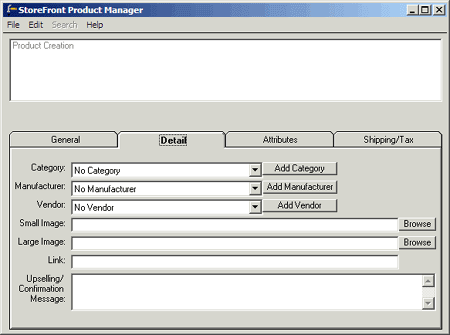
- Category: If
desired, click the dropdown arrow
to select a category for the current
product.
- Manufacturer: If
desired, click the dropdown arrow
to select a manufacturer
for the current product.
- Vendor: If
desired, click the dropdown arrow
to select a vendor
for the current product.
- Small image: If you wish to display a small
image of the product, click Browse to locate
the image in the images folder for your group. Small images
should be from 75 to 100 pixels wide. Note: Images must be
put into the site before you can browse to them using this
button. If you don't have a small image, leave this field
blank.
- Large Image: Click Browse
to locate a larger image of the product. Large images should
be approximately 200 pixels wide.
- Link: When this product is displayed
in the results of a user search, users can click on the
small image to go to its product detail page.
- Type detail.asp?PRODUCT_ID= in
the Link field.
- Type in the ID for
your product right after the equals sign. Make sure there
are no spaces in the link when you are done. Your link
should look exactly like this except for
the value after the equals sign:

Note: You can find the Product ID on the
General tab.
- Upselling/Confirmation Message: Enter a
message to be displayed to customers after they add this item
to their order. You can also use this place to recommend another
product.
|
 |
Do not fill in the shipping tab. Open the File menu
and select Save Products. Then exit every window
until the Configure Store window is closed.
|
 |
Upload your
entire site and visit your group homepage to see the changes. |
|