CNST
Help Guide
  Home || CNST 220 Start || CNST 328 Start || Customize Your Store || Manage Your Store || Software Tools

Paint Shop Pro


Open an Image

Set the Resolution

Adjust the Dimensions

Save the File

Upload the File

Using Paint Shop Pro Help
 
Adjust the Image Dimensions
Select the image file.
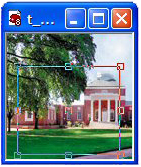
Click the Crop tool button.
Look to the left for the button menu and click the crop tool.
The tool will be activated and change the look of
the cursor.

If the menu is not present, click View, then Toolbars. Then check off the Tool Palette menu on the list and close the list window.
Select an area in the image.
  1. Put the cursor over your image.
  2. Hold the left mouse button down and move the cursor. You will see a box formed over the picture.
  3. Drag the sides of the box to change the selection dimensions. You can also click the center of the box and drag the entire selection box to the desired area of the image.
Adjust the dimensions.
Your image must fit into a target area or image placeholder on your web page. Be sure to write down these dimensions and adjust your image in Paint Shop Pro to match. For example, it the target image area in the web page is 128 x 60 pixels, adjust your image dimensions in Paint Shop Pro to be exactly 128 x 60 pixels.
  1. Locate the pixel dimensions area in the far lower left of the main screen area.
  2. Adjust the selection area until you get the desired dimensions. As you resize the box over the picture, the pixels dimension area in the lower left will change. Stop when these match your target area in your homepage.
Crop the image.
  1. Click the Image menu item.
  2. Click Crop from the dropdown list.

>> Save the image file now.