Dreamweaver

Text Editing
Links & Text Properties
Background Colors
Images
Upload
Files
|
|
| Images |
 |
Open your homepage template — default.asp.
- Look to the right for the Files panel
as shown below. If it is not displayed, press F8 on
your keyboard. The following Files panel
will appear and may display your group's folder as open.
Make sure the dropdown list on the right displays "Local
View."
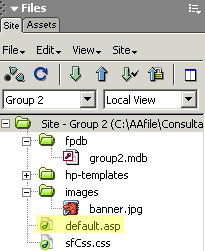
- After your group's files and folders appear in the site
file listing, double-click the default.asp file.
It will open in the main editing area.
|
 |
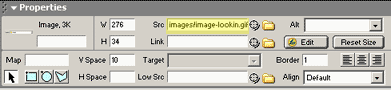
Select an image or blank area.
- Click on an image or image placeholder inside any teal
tag area. Other areas will be locked.

- Be sure to write down the dimensions of the area if you
want to replace the current image or image placeholder. Look
for these dimensions in the properties window.

- Then create an image with the same dimensions using other
software. In this case, the image is 280 x 30 pixels. Be
sure to create .jpg, .jpeg,
or .gif images.
|
 |
Create and
prepare the image.
Use Paint Shop Pro or another image editor to match the pixel
dimensions of the target area. Create and save your image for insertion.
|
 |
Insert the image.
After you have created an image to match
the dimensions of the target area on the page:
- Store the image file you created in the image folder in
your group folder on your computer desktop: You can save
this file the same way you saved your homepage template file.
Make sure the file name does not contain spaces.
- Go back to Dreamweaver and open the images folder
in your site. You should see the image file you just placed
there.
- Open the default.asp page (your homepage) and click on
the place where you want to insert the image.
- Delete the current
image or image placeholder
by pressing the Delete key
on your keyboard. If
there is no image, skip
this step.
- Click inside the teal tag area that will hold the image.
- Go to the top menu of the screen and click Insert,
then Image. Use the Look in dropdown
list. Find your image folder and
click on your image file. A preview
will be displayed. Press OK.

- If you need to change an existing image, select it by clicking
on it. Then go to the Properties panel below and click on
the yellow folder to the right of the Src field
to locate and select the image file. Finally, the field should
look like this, except with your file's name:
- Your image will now appear in the area you selected.
|
 |
Adjust the image.
Use the following areas of the Properties window to affect
the image:
- Alt: Type in short text that will appear until the
image is loaded on the user's browser. This is important since many
users have slow Internet connections and may have to wait for your
image to load.
- Link: You can type in a Web site address that the
picture can link to. Be sure to include "http://" at
start of any address.
- Reset Size: If your picture does not look right,
push this button which will cause it to be displayed as you intended.
You can also click the circular arrow on the image dimensions.

- V Space: Add space on the top and bottom of the
image. Type in the number of pixels and observe the effect.
- H Space: You can also add white space on the left
and right side of the image. Type in the pixel value again.
- Border: Type in a pixel value for a border.
- Horizontal Alignment: Use the familiar paragraph
alignment symbols to move the image to the left, center, or right.
- Align (Text alignment): Indicate
where you want the picture to be when it is placed in or near text.
To observe the full effects, you must save and preview your page
(see below).
|
 |
Save
the file by clicking on File,
and then Save. |
 |
Preview
your page.
Go to the preview area for
your store on the tutorial
home page by clicking your
group name. Next, type the
name of your file at the end
of the web address appearing
in the browser and press ENTER on
your keyboard. If you are satisfied, upload the default.asp file.
|
| >> Upload files
now. |
|